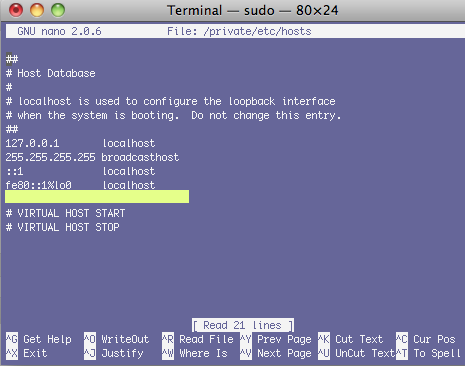
There are times during DNS changes or other testing that you may want to specify a particular IP for a domain name. To do this, you’ll need to edit your hosts file. This way you can “trick” your computer before DNS actually changes or point a domain to another IP, even a local one. Some of the instructions out there on how to do this are a little too bloated, so I tried to simplify them as much as possible here on DotResults. If you have any questions about this, please leave a comment and we’ll get back to you as soon as we read it.
1. Open Terminal

2. Paste this command:
sudo nano /private/etc/hosts
You’ll be asked to enter your administrator password.
3. Arrow down to the last line, highlighted here, and type your entry like this: 137.61.27.216 www.tech.com

4. Press control+x. Type the letter Y. This saves the file.
5. To flush your DNS cache so the changes take effect, paste this command next:
dscacheutil -flushcache
6. You can test if it has worked by using the PING command. Try PING tech.com and PING www.tech.com – the IP addresses should be different.
Lauren
Thanks a lot! Really helped me out 🙂
Glen
Where do I paste the command to flush?
Glen
OK sorted it!
Glen
Thank you by the way!
Ilhan
Thank you this helped me a lot! I couldn’t find a decent explanation until I came upon your page. Cheers.
Richard Tibbitts
This is the first time I’ve ever experienced success at editing the hosts file, after several years of intermittent attempts. Nobody shows you how to use the command line; they just say “Uh, edit the hosts file,” or “Go to private/etc/hosts,” or something like that.
So thank you for being concise and accurate!
Ted
This was great! The only hiccup I experienced was in saving the hosts file. After you hit Cntrl+x and then type the letter y, you then have to hit enter!
Thanks for the instructions.
William
Great article. Easy to understand. Thanks for the help!
Marc
I would like to edit the hosts file, however, when I am prompted to enter a password, I can not type anything.
Do you know how I can get around this problem?
Thank you so much.
Richard Tibbitts
You omitted the necessary detail of pressing Enter after pressing Control-X and then Y. By itself, pressing Y does not save the file, as someone else noted over a year ago.
It’s important to check your work before putting it out there. But thanks again for all the information on the subject.